Graphic Object Toolbox for Canvas Series
Note: For Canvas Series only. For all other series see Graphic Object Toolbox.
See also: User Interface
See also: Fonts
See also: Screen Development
See also: Multi-Language Support
Topic Menu
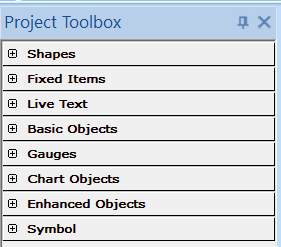
Project Toolbox

|
Using Graphics and Animation |
In order to view the Toolbox, a new screen must be added in order to open Screen Workspace:
To add New Screen: Home > View > Project Navigator > User Interface > Main Screen [Right-Click] > New Screen
Once a Screen Workspace is created, the Graphic Object Toolbox will be available.
To add Objects: Home > View > Project Toolbox
Note: Ensure the proper workspace is showing Screen and not Main.
Types of Graphic Objects
Shapes
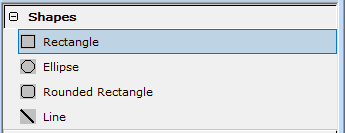
-
Shapes Object for Canvas - These objects may be layered and are updated if the dynamic field of an object beneath the drawing primitive is updated.
Note: Each shape counts as an object in the object-per-page limit.
Fixed Items
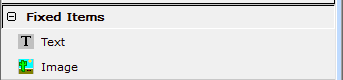
-
Text Label for Canvas - Used to type text anywhere on screen. Text is displayed as typed.
-
Picture/Graphic Object for Canvas - Allows the user to select, copy, and paste a bitmap from a file or add a bitmap into the default bitmap directory. It also allows the editing of a bitmap via a bitmap editor selected by the user.
Live Text
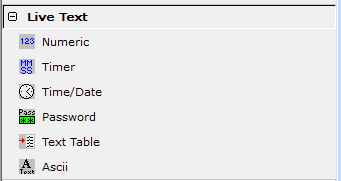
-
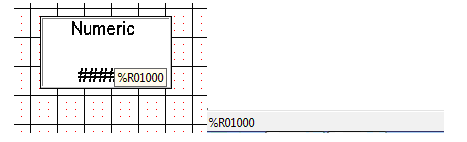
Numeric Data Object for Canvas - Formats numeric data that is either read from a specific register, or if desired, is written to the register.
-
Timer Data Object for Canvas - Formats a timer accumulator
 A register/variable used to gather or accumulate a total of time, counts, items, or events. or preset (or any other registers) in HH:MM:SS.xxx format. If selected as editable data can be entered in to the register in the same format also.
-
Time/Date Object for Canvas - Formats the time /or date display that is read from specific registers, or if desired, is written to the registers.
-
Password Object for Canvas - Formats a password that is written to the register without displaying the entry.
-
Text Table Object for Canvas - Creates a text table and formats the text in the table that is read from a register, or if desired, is written to the register.
-
ASCII Data Object for Canvas - Formats text that is read from a register, or if desired, is written to the register.
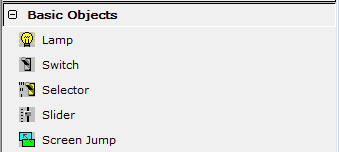
Basic Objects
-
Lamp/Indicator Object for Canvas - Displays and formats an indicator that is associated with a source register. Indicator types include round or square lamps or bulbs.
-
Switch Object for Canvas - Displays and formats a switch that is associated with a write register. Switch types include standard, round, square or rocker switches. Switches can be tied to a soft key on the OCS screen or controllers register.
-
Selector Object for Canvas - Displays and formats a multi-position switch that is associated with a write register. Position switch types include one-, two-, three- or four-position switches. Position switches can be tied to a soft key on the OCS screen or a controller register.
-
Slider Object for Canvas - This object allows an analog value to be adjusted with a simulated slider and/or trim buttons.
-
Screen Jump Object for Canvas - Formats a screen jump to a specific screen number address / number. Screen jumps can be tied to a soft key on the OCS screen or a controller register.
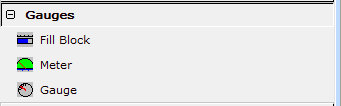
Gauges
-
Bar Graph Object for Canvas - This tool fills the block associated with a specific source register either in rectangular type or circular type.
-
Meter Object for Canvas - Formats a meter associated with a specific source register. Scale ranges are selected by the user
-
Gauge Object for Canvas - Displays analog data with a round, automotive style gauge. Can be placed over a bitmap
A non-compressed image file format which uses small dots in a grid pattern to create an image. for a realistic look.
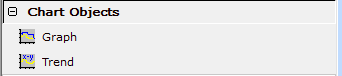
Chart Objects
-
Graph Object for Canvas - Creates and formats a X-Y Graph which represents variations of a variable in comparison to variations of one or more other variables. A number of values can be plotted or located by means of x-y coordinates. Up to 4 different variations (registers) can be graphed using Configure Pens. A Trigger Refresh address is required to reset the registers and reactivate the plotting process.
-
Trend Object for Canvas - Creates and formats a Data Trend Box which tracks one or more variables over time. Four types of trend boxes are available. Up to 4 trends (registers) can be graphed in each Data Trend Box using Configure Pens. A Trigger address is required to activate the trending process for each Data Trend Box.
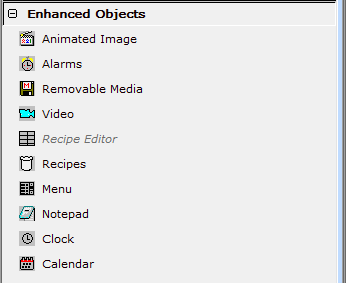
Enhanced Objects
-
Animated Picture/Graphic for Canvas - This button allows the user to copy and paste 2 or more static bitmaps into a series of frames. After doing so, the bitmaps can be animated to depict motion or state changes. Bitmaps are not animated using this button.
-
Alarm Object for Canvas - This object displays alarm summaries or logs as a list or an indicator button.
-
Removable Media Object for Canvas - This object allows displaying the contents of Removable Media cards and managing files and cards.
-
Video Object for Canvas - Displays and formats a video display associated with a channel of the optional Video Card display. Can be tied permanently to a given channel or can be dynamically changed from channel to channel.
-
Recipe Editor Configuration for Canvas - The recipe editor object is an older way of editing multiple data fields and is not used with the newer recipe editor. The newer Recipes object is used in conjunction with the Recipes Editor and allows load, save, edit and view of those recipes.
-
Recipe Editor Functions Object for Canvas - Allows configurable access to the Recipe.
-
Menu Object for Canvas - Configures Menu Object on the selected OCS.
-
Notepad Object for Canvas - Allows the operator to leave notes by "writing" on the screen.
-
Clock Object for Canvas - Displays the time that is read from a specific register, or if desired, is written to the register. Clock object can be either Analog clock format or Digital clock format. Clock object uses 3 consecutive 16 Bit Registers.
-
Calendar Object for Canvas - Displays the date that is read from a specific register, or if desired, is written to the register. Calendar object uses 3 consecutive 16 Bit Registers.
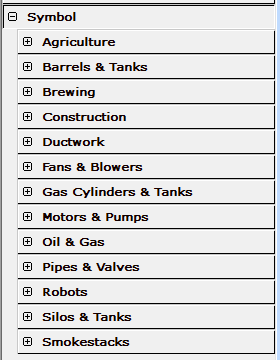
Symbol Objects
Cscape 10 has inbuilt set of symbols available in Graphics Toolbox that can used to display the operation and status of operating systems.
Return to the Top: Graphic Object Toolbox for Canvas Series
Object Placement (Editing)
This section covers the actual placement, sizing and, deletion of the object on the current screen.
Inserting an Object
Once the user enters the graphical editor, the first display screen is displayed and ready to accept an object. To select and place an object on the screen:
-
Click on the desired object on the object toolbar.
-
Press and hold the left mouse button once the cursor is on the desired location of the upper left corner of the object.
-
Pull the mouse down and to the right until the desired object size is reached then release the mouse.
The object will then appear on the screen. Note that if snap-to-grid is enabled, the object may ’snap’ to the nearest grid dimensions instead of than defined with the mouse clicks.
Selecting an Object
Immediately after an object is inserted on the screen, it is ’selected’. Selection is denoted by a RED selection band (rectangle with sizing handles in the corners and sides) outlining the object. Should a new object be inserted or the user click on another object, the former object will no longer be selected and will no longer be outlined with the RED selection band.

Selected Object
When an object is selected, the area immediately within the selection band is the object’s bounding rectangle. When placed on a screen, an object generally displays a border outline on its bounding rectangle as the default configuration. To select an object when editing, simply click anywhere within or on that bounding rectangle. In the case of layered objects, click on the ’visible’ portion of the object. If an object is completely covered, it may be temporarily brought to the foreground (made visible) and selected. (See Tools Reference: To Back.)
An exception to the selection process occurs with the drawing primitives such as circles and rectangles. When the object’s background is a solid color, selection is as defined above. However, should the object have a ’transparent’ background, the user must click directly on the object’s bonding rectangular border to select that object.
Pressing TAB will select the next object on the screen. Pressing CTRL + TAB will select the next object behind the currently selected object if there are overlapped objects. (See Overlapped objects below.)
Moving an Object
-
Select object
-
Placing the cursor with-in the object bounding rectangle (crossing lines with arrow heads will appear.)
-
Press and hold left mouse button
-
Move to desired location and release mouse button
Sizing an object
-
Select object
-
Place the cursor within a sizing handle on the RED selection band on the side to move (single line with arrow heads will appear)
-
Press and hold left mouse button
-
Drag object edge to new location and release mouse button
Layering objects (front vs. back)
Dynamic objects are generally NOT transparent and will cover a portion of an existing object if placed over that existing object. In some cases this may be the desired outcome such as placing a numeric display object on top of a meter object. Objects will be layered in the order that they are inserted on the screen. However the user may alter that ordering (see Tools Reference: To Front/To Back).
-
Right-click on object and select To Front or To Back from pop-up menu.
Deleting an Object
Selecting object and press DEL key
[OR]
Right-click object within bounding rectangle and selecting DELETE from the pop-up menu.
Return to the Top: Graphic Object Toolbox for Canvas Series
Object Grouping
Objects may be grouped together and treated as a single entity. This new entity can then be deleted, cut, copied, or saved to a file. In addition, all objects within a group may be aligned to any side or centered horizontally or vertically.
Temporary Grouping Objects
-
From the Tools toolbar select the Group Selector.
-
Click and drag a selector band around the objects to be selected starting in the upper left corner.
The objects are now temporally grouped and right-clicking within that group will invoke a pop-up menu for group operations. If the group operation is NOT to permanently group the objects, the grouping will be lost after that selected group operation.
Permanent Grouping Objects
-
Temporally select a group of objects.
-
Right-click within the group and select Group from the menu.
If the objects are permanently grouped, thereafter selecting any of the objects will select the group. When a group is selected, it will be outlined with a red selection band with handles. To indicate that the selection is actually a group instead of a single object, the selection band will be dashed.
Ungrouping Objects
-
Select the group
-
Right-click within the group and select Ungroup from the menu.
Moving a Group
-
Select the group.
-
Move the cursor to the center of the group until it changes to the movement icon.
-
Press and hold left mouse button while dragging the group to the new location and release mouse button.
Sizing a Group
-
Select the group
-
Place the cursor within a sizing handle on the RED selection band on the side to move (single line with arrow heads will appear)
-
Press and hold left mouse button
-
Drag object edge to new location and release mouse button
Cut, Copy and Pasting Groups
-
Select the group
-
Right-click within the group and select Cut or Copy from the menu.
Once a group is copied to the clipboard, it may be pasted to any screen using the right-click menu.
Deleting a Group
Select the group, then press the DEL key.
OR
Right-click within the group and select Delete from the menu.
Saving a Group
-
Select the group.
-
Right-click within the group and select Save.
-
Select the filename and location from the Save As dialog
Once a group is saved as a file, it can be brought in to any application though the Grouping/Import Group menu option.
Import a Group
-
Select Grouping/Import Group from the menu bar.
-
Select a file to import from the menu and click OK.
-
Group will be placed on screen, click on group and move to the desired location.
As part of this distribution, a small library of groups is provided. This library provides templates (virtual menus and virtual control panels) and animated objects (pipes, valves, pumps and tanks) which the user may import, position and size appropriately. These objects are located under appropriated directories starting at the directory opened with the Grouping/Import Group menu.
Aligning objects in a Group
-
Select the group.
-
Right-click within the group and select Align.
-
Select the appropriate action.
Return to the Top: Graphic Object Toolbox for Canvas Series
Working with Overlapped Objects
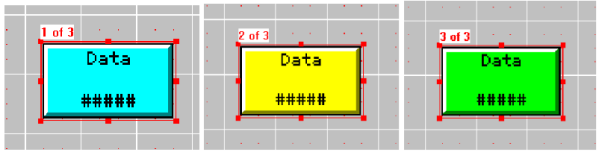
Selecting Overlapped Objects
When an object is selected that overlaps another object or is overlapped by an object a layering indicator in red text is displayed as seen above. The layering indicator will show "X of Y" where X is the layer of the selected object, one (1) being the front most and a higher number being the back most. Y represents the number of objects in the area of the selected object.
In the figure above the first selection shows "1 of 3" this indicated that the front (1) object is selected and there are three (3) objects in the selected region. In the second figure the layering indicator shows "3 of 3". This indicated the third (back most) object is selected of the three (3) objects in the selected region.
Changing the Selection of Overlapped Objects
The figures above show three objects exactly overlapped. Selecting the first object shows the layering indicator of "1 of 3" indicating the first object of three has been selected. Pressing CTRL + TAB will select the next object behind the currently selected object. In the example above the yellow numeric object is selected and the layering indicators show "2 of 3" to indicate the object second from the front is selected in a field of three objects. Pressing CTRL + TAB again selects the third object and changes the layering indicator to "3 of 3".
Return to the Top: Graphic Object Toolbox for Canvas Series
Tool Tip for Graphics Objects
Graphics objects support tool tips. Hovering the pointer over any applicable graphics object displays the primary register configured for that object both as a tool tip and in the status bar as well. NOTE: Excludes Text, Menu, Bitmap, Alarms, Removable Media, Video and Recipe objects.
Ctrl - Click Support
From Cscape 9.60 onwards, Crtl - Click selection for multiple graphics objects has been supported. Multiple graphics objects can now be selected by Crtl - Click combination.
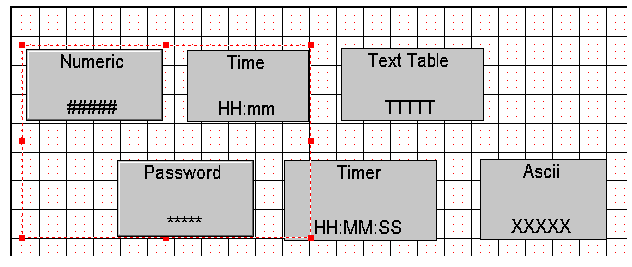
In the above screen shot Numeric, Time and Password objects are selected by Ctrl - Click combination.
Return to the Top: Graphic Object Toolbox for Canvas Series